IIW-Type 2 Calibration Block (Inch Version) Special Alloy
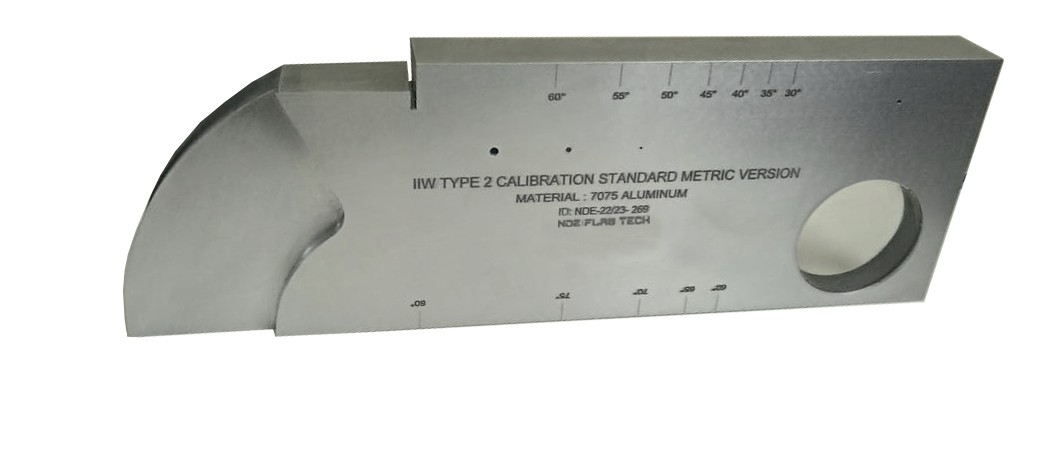
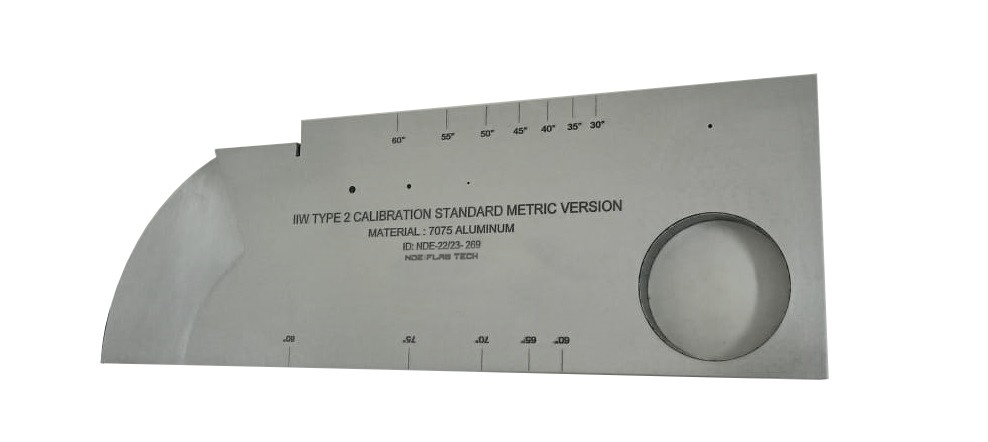
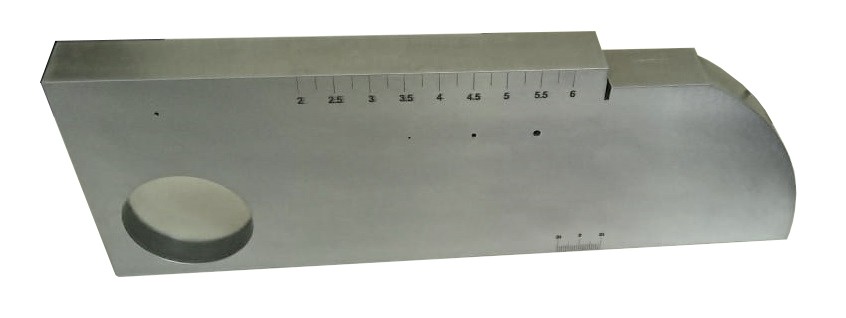
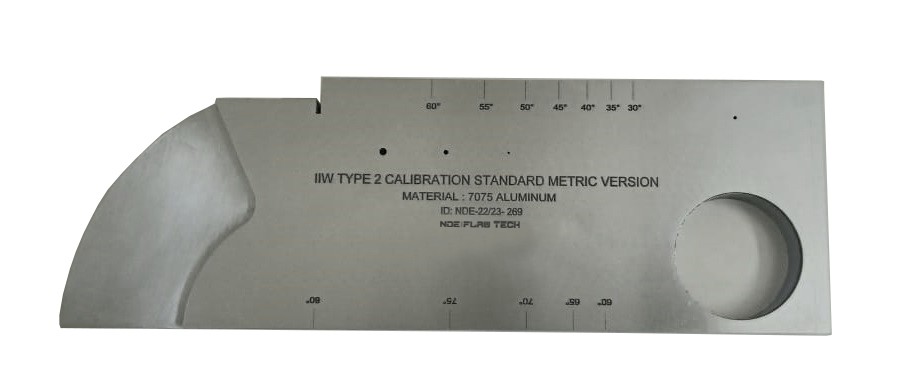
IIW-Type 2 Calibration Block (Inch Version) Special Alloy IIW type blocks are used to calibrate instruments for both angle beam and normal incident inspections. Some of their uses include setting metal-distance and sensitivity settings, determining the sound exit point and refracted angle of angle beam transducers, and evaluating depth resolution of normal beam inspection setups. Instructions on using the IIW type blocks can be found in the annex of American Society for Testing and Materials Standard E164, Standard Practice for Ultrasonic Contact Examination of Weldments. A modified version of the original IIW-Type 1 design. Includes a 2.0" radius x .250" deep cut-out superposed on the 4.0" radius for distance calibration. Also includes numbers 3, 5 and 8 through holes (3/64", 5/64" AND 8/64" diameter) for sensitivity testing or surface wave inspection, and distance calibration marks to the 2.0" hole. In accordance with International Institute of Welding, ASTM E164 and U.S. Air Force NDI Manual T.O. 33B-1-1 specifications. Dimensions: 12.0" x 4.0" x 1.0" Material: Special Alloy

IIW-Type 2 Calibration Block (Inch Version) 4340 Steel
IIW-Type 2 Calibration Block (Inch Version) 4340 Steel IIW type blocks are used to calibrate instruments for both angle beam and normal incident inspections. Some of their uses include setting metal-distance and sensitivity settings, determining the sound exit point and refracted angle of angle beam transducers, and evaluating depth resolution of normal beam inspection setups. Instructions on using the IIW type blocks can be found in the annex of American Society for Testing and Materials Standard E164, Standard Practice for Ultrasonic Contact Examination of Weldments. A modified version of the original IIW-Type 1 design. Includes a 2.0" radius x .250" deep cut-out superposed on the 4.0" radius for distance calibration. Also includes numbers 3, 5 and 8 through holes (3/64", 5/64" AND 8/64" diameter) for sensitivity testing or surface wave inspection, and distance calibration marks to the 2.0" hole. In accordance with International Institute of Welding, ASTM E164 and U.S. Air Force NDI Manual T.O. 33B-1-1 specifications. Dimensions: 12.0" x 4.0" x 1.0" Material: 4340 Steel.

IIW-Type 2 Calibration Block (Inch Version) 1018 Steel
IIW-Type 2 Calibration Block (Inch Version) 1018 Steel IIW type blocks are used to calibrate instruments for both angle beam and normal incident inspections. Some of their uses include setting metal-distance and sensitivity settings, determining the sound exit point and refracted angle of angle beam transducers, and evaluating depth resolution of normal beam inspection setups. Instructions on using the IIW type blocks can be found in the annex of American Society for Testing and Materials Standard E164, Standard Practice for Ultrasonic Contact Examination of Weldments. A modified version of the original IIW-Type 1 design. Includes a 2.0" radius x .250" deep cut-out superposed on the 4.0" radius for distance calibration. Also includes numbers 3, 5 and 8 through holes (3/64", 5/64" AND 8/64" diameter) for sensitivity testing or surface wave inspection, and distance calibration marks to the 2.0" hole. In accordance with International Institute of Welding, ASTM E164 and U.S. Air Force NDI Manual T.O. 33B-1-1 specifications. Dimensions: 12.0" x 4.0" x 1.0" Material: 1018 Steel.

IIW-Type 2 Calibration Block (Inch Version) STAINLESS STEEL 304
IIW-Type 2 Calibration Block (Inch Version) STAINLESS STEEL 304 IIW type blocks are used to calibrate instruments for both angle beam and normal incident inspections. Some of their uses include setting metal-distance and sensitivity settings, determining the sound exit point and refracted angle of angle beam transducers, and evaluating depth resolution of normal beam inspection setups. Instructions on using the IIW type blocks can be found in the annex of American Society for Testing and Materials Standard E164, Standard Practice for Ultrasonic Contact Examination of Weldments. A modified version of the original IIW-Type 1 design. Includes a 2.0" radius x .250" deep cut-out superposed on the 4.0" radius for distance calibration. Also includes numbers 3, 5 and 8 through holes (3/64", 5/64" AND 8/64" diameter) for sensitivity testing or surface wave inspection, and distance calibration marks to the 2.0" hole. In accordance with International Institute of Welding, ASTM E164 and U.S. Air Force NDI Manual T.O. 33B-1-1 specifications. Dimensions: 12.0" x 4.0" x 1.0" Material: STAINLESS STEEL 304.

IIW-Type 2 Calibration Block (Inch Version) STAINLESS STEEL 316
IIW-Type 2 Calibration Block (Inch Version) STAINLESS STEEL 316 IIW type blocks are used to calibrate instruments for both angle beam and normal incident inspections. Some of their uses include setting metal-distance and sensitivity settings, determining the sound exit point and refracted angle of angle beam transducers, and evaluating depth resolution of normal beam inspection setups. Instructions on using the IIW type blocks can be found in the annex of American Society for Testing and Materials Standard E164, Standard Practice for Ultrasonic Contact Examination of Weldments. A modified version of the original IIW-Type 1 design. Includes a 2.0" radius x .250" deep cut-out superposed on the 4.0" radius for distance calibration. Also includes numbers 3, 5 and 8 through holes (3/64", 5/64" AND 8/64" diameter) for sensitivity testing or surface wave inspection, and distance calibration marks to the 2.0" hole. In accordance with International Institute of Welding, ASTM E164 and U.S. Air Force NDI Manual T.O. 33B-1-1 specifications. Dimensions: 12.0" x 4.0" x 1.0" Material: STAINLESS STEEL 316

IIW-Type 2 Calibration Block (Inch Version) TITANIUM
IIW-Type 2 Calibration Block (Inch Version) TITANIUM IIW type blocks are used to calibrate instruments for both angle beam and normal incident inspections. Some of their uses include setting metal-distance and sensitivity settings, determining the sound exit point and refracted angle of angle beam transducers, and evaluating depth resolution of normal beam inspection setups. Instructions on using the IIW type blocks can be found in the annex of American Society for Testing and Materials Standard E164, Standard Practice for Ultrasonic Contact Examination of Weldments. A modified version of the original IIW-Type 1 design. Includes a 2.0" radius x .250" deep cut-out superposed on the 4.0" radius for distance calibration. Also includes numbers 3, 5 and 8 through holes (3/64", 5/64" AND 8/64" diameter) for sensitivity testing or surface wave inspection, and distance calibration marks to the 2.0" hole. In accordance with International Institute of Welding, ASTM E164 and U.S. Air Force NDI Manual T.O. 33B-1-1 specifications. Dimensions: 12.0" x 4.0" x 1.0" Material: TITANIUM.

IIW-Type 2 Calibration Block (Inch Version) ALUMINUM 7075-T6
IIW-Type 2 Calibration Block (Inch Version) ALUMINUM 7075-T6 IIW type blocks are used to calibrate instruments for both angle beam and normal incident inspections. Some of their uses include setting metal-distance and sensitivity settings, determining the sound exit point and refracted angle of angle beam transducers, and evaluating depth resolution of normal beam inspection setups. Instructions on using the IIW type blocks can be found in the annex of American Society for Testing and Materials Standard E164, Standard Practice for Ultrasonic Contact Examination of Weldments. A modified version of the original IIW-Type 1 design. Includes a 2.0" radius x .250" deep cut-out superposed on the 4.0" radius for distance calibration. Also includes numbers 3, 5 and 8 through holes (3/64", 5/64" AND 8/64" diameter) for sensitivity testing or surface wave inspection, and distance calibration marks to the 2.0" hole. In accordance with International Institute of Welding, ASTM E164 and U.S. Air Force NDI Manual T.O. 33B-1-1 specifications. Dimensions: 12.0" x 4.0" x 1.0" Material: ALUMINUM 7075-T6

IIW-Type 2 Calibration Block (Inch Version) INCONEL 625
IIW-Type 2 Calibration Block (Inch Version) INCONEL 625 IIW type blocks are used to calibrate instruments for both angle beam and normal incident inspections. Some of their uses include setting metal-distance and sensitivity settings, determining the sound exit point and refracted angle of angle beam transducers, and evaluating depth resolution of normal beam inspection setups. Instructions on using the IIW type blocks can be found in the annex of American Society for Testing and Materials Standard E164, Standard Practice for Ultrasonic Contact Examination of Weldments. A modified version of the original IIW-Type 1 design. Includes a 2.0" radius x .250" deep cut-out superposed on the 4.0" radius for distance calibration. Also includes numbers 3, 5 and 8 through holes (3/64", 5/64" AND 8/64" diameter) for sensitivity testing or surface wave inspection, and distance calibration marks to the 2.0" hole. In accordance with International Institute of Welding, ASTM E164 and U.S. Air Force NDI Manual T.O. 33B-1-1 specifications. Dimensions: 12.0" x 4.0" x 1.0" Material: INCONEL 625.

IIW-Type 2 Calibration Block (Inch Version) MONAL 800
IIW-Type 2 Calibration Block (Inch Version) MONAL 800 IIW type blocks are used to calibrate instruments for both angle beam and normal incident inspections. Some of their uses include setting metal-distance and sensitivity settings, determining the sound exit point and refracted angle of angle beam transducers, and evaluating depth resolution of normal beam inspection setups. Instructions on using the IIW type blocks can be found in the annex of American Society for Testing and Materials Standard E164, Standard Practice for Ultrasonic Contact Examination of Weldments. A modified version of the original IIW-Type 1 design. Includes a 2.0" radius x .250" deep cut-out superposed on the 4.0" radius for distance calibration. Also includes numbers 3, 5 and 8 through holes (3/64", 5/64" AND 8/64" diameter) for sensitivity testing or surface wave inspection, and distance calibration marks to the 2.0" hole. In accordance with International Institute of Welding, ASTM E164 and U.S. Air Force NDI Manual T.O. 33B-1-1 specifications. Dimensions: 12.0" x 4.0" x 1.0" Material: MONAL 800.

